Saturday, December 31, 2016

Christmas Stocking Upgrade

I wonder if my crafting buddies are feeling like me this week; having had an awesome Christmas yet looking forward to once again being in back in my own little world  studio.

For me, here in The Underground, the best part of Christmas was having my daughter-in-law and granddaughters with me, and yes, we did have a bit of time in the studio. My oldest granddaughter, now 18 years of age, has out grown her baby stocking (Santa just can't get all her wishes into a small felt stocking).

Not wanting to part with it, we decided to make a larger one and attach the juvenile stocking to the front. So, out comes Miss Wilma and away we go, quilting the fabric.

Alison carefully marks the quilting lines.

Sister, Camille, helps with the quilting.


Now she has not just a stocking, but two stockings in one. Somehow I have a feeling that will not be enough!

The girls have returned to their home in Florida, leaving Handy Randy and I a bit lonely. No worries, in no time we will be consumed with projects to feel that "empty" place.

Wishing all of you a healthy and happy year full of crafting in 2017!


Wednesday, December 14, 2016

Will I ever get it right?

Why is it when I come up with a really cool design, I botch the construction; when I do a really good job with the construction, the design is underwhelming?

I am giving a gardening gift and thought it would be oh so cool to present it in a nice vegetable theme market bag. I just happened to have the perfect fabric.

This was to be a really nice, lined market tote with a pocket. It was a new pattern (actually it wasn’t a pattern just an inspiration in Somerset Studio Haute Handbags magazine,) so I carefully cut the pieces and took my time stitching. Everything was fine until I got to the pocket; well let’s just say that didn’t go so well.

Time was kind of short as this gift needed to be mailed so I defaulted to a previous bag project from Linda Matthews Creative Bag to make a simple bag. The fabric I intended for the lining became the fabric of the bag. I used French seams and only had to rip one out due to sewing right sides together instead of wrong sides together, (if you have done French seams, you know what I mean.)

It turned out fine except when I switched thread from Coats and Clark to Sew-ology; the stitches were not as pretty. Is this a universal problem or could it be my machine doesn’t like the Sew-ology thread? Not perfect but then it is handmade.

Now that you have listened read my woes, I will leave you with a little tip; seam guides. I ordered this vintage Singer Seam Cloth Guide for Miss Wilma from The Featherweight Shop; it is invaluable, especially for top stitching.

The Sew-ology magnetic guide from Hobby Lobby works just fine on the Brother Machine.

Will I ever be satisfied with the design and construction? I will work on it, but for now it is all about Christmas in The Underground. The granddaughters are coming and I must be ready!

Second thought; after sleeping on it, I took another look at the bags. I really do like the original design; questioning if the stitching on the pocket will really be that noticeable. I think the gardener recipient may get the one intended for her.   


Monday, December 5, 2016

Meet Miss Wilma


Miss Wilma was gifted to me by HR’s first cousin once removed (at least I think that’s the relationship as she was HR’s father’s first cousin.) She once belonged to HR’s grandmother. The family lived in central Kansas and was very active in the Lutheran Church. Miss Wilma was frequently carried to the church for quilting bees. Okay, when Miss Wilma participated in the quilting bees, she didn’t have a name.

Actually this little girl was just a portable sewing machine back in the day. Not so these days; she is part of an elite group born manufactured between 1933 and 1968. Sturdy and reliable, these little beauties continues to be sought out by quilters and collectors. When Cousin Wilma offered this one to me, I didn’t realize what a treasure I was getting. (Yep, she is Cousin Wilma’s namesake.) I don’t think Cousin knew either. She knew I liked to craft and was traveling around in an RV, and thought it perfect sense that I would need a small sewing machine (and she was right!) Miss Wilma has become a very good friend and traveling companion, traveling coast to coast in The Wanderer and is very much at home and useful when we are hanging out with family in Texas and Florida.

I have learned so much about this little machine on The Singer Featherweight Shop website (where I can get parts and attachments) and Singer Featherweight 221 and 222K Facebook page, (with about 12,000 friends!) One of the things I learned is Featherweight owners quite often name their girls. When Cousin Wilma passed away a few weeks ago, I thought it only fitting that my little sweetheart should be named Wilma.

When gifting the Featherweight to me, Cousin Wilma had one stipulation; I was to never sell her. So, I am encouraging my granddaughters to become acquainted in hopes one of them will adopt her when I am no longer able to play with use her.

HR loves doing her checkups.
They are both 1953 vintages.

Carman over at The Singer Featherweight Shop has a free and very informative tutorial on maintenance of the Featherweights.

Miss Wilma is now back in The Underground, tuned up for Christmas crafting. 

Wednesday, November 30, 2016

Organization in The Wanderer

I am back in The Underground! The Wanderer has been unloaded and cleaned; I am ready for serious crafting! We had a wonderful Fall Adventure but I am happy to return to my studio. It didn't take me long to find a project.

Using my Silhouette Portrait, I cut vinyl letters to keep me organized when on the road. I had vinyl that I had purchased from a hobby store when I first attempted to play with this product. (Remember my frustrations with it tearing and not adhering?) It did okay on this project except where the text needed to curve, it really didn't want to curve.

My guess is I will be replacing the vinyl with my fav, Oracal 651. But for now, I'll see what happens.

I am happy to report the Oracal 651 bohemian design on the garden shop door looks as good as it did when applied 3 months ago. I am really loving this product!

The Wanderer is on her way to winter storage and I am hunkering down for winter in The Underground.


Monday, November 21, 2016

My Thanksgiving Guilt Trip

Happy Thanksgiving to all my crafty friends! Wow, do I have so much for which to give thanks! Retirement, opportunity to travel, good health, a warm and cozy home (complete with a craft studio with more craft supplies than I will ever use,) totally awesome friends, a wonderful family that loves me (even if they don't understand me) and of course HR (whatever would I do without Handy Randy?) 


I don't know about you, but I sort of feel guilty to be so fortunate. While I leisurely drink my coffee each morning, reading the news, blogs and emails, there are women struggling to find food to feed their family. Many cannot read because they live in a culture that does not embrace a woman's right to be educated. When I go to my studio in my free afternoons, I often "struggle" to decide just what project in which to become immersed. Many mothers and grandmothers in the world do not have "free time" and if they did they would not have the resources to create for fun. When we go off in The Wanderer to explore our great nation, I am reminded of refuges camping in tents to survive oppression. I ask myself, do I ignore the plight of grandmothers, mothers and young girls not as fortunate or do I find a way to use my passion to craft to help ease the struggles (and my guilty conscience.) This is an issue that has taken a great bit of real estate in my mind of late and is leading me to search for a resolution.

So, do y'all know of organizations that would like to have donations of craft items? Sewing, knitting, crocheting, paper; if it is not a craft in my skill set, perhaps I can pass the info through The Underground to other crafters. Or maybe you have other ideas on using the craft passion obsession to serve others? Please share your knowledge and ideas in the comments below.

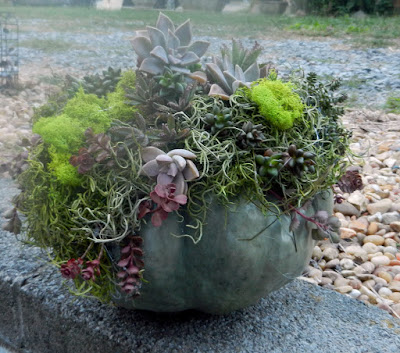
Now that I have that off my mind, I am leaving you with the instructions on making this really easy centerpiece for your Thanksgiving table.


All you need is a pumpkin, moss, succulents and a glue gun.

First put some moss on the top of the pumpkin using a glue gun (or you could use spray adhesive.) Do not cut the top off the pumpkin.

Take succulent cuttings and glue to the moss. That is it!


Note, this arrangement will last for several weeks. When you no longer want it or the pumpkin starts to decay, slice the top off the pumpkin, leaving the succulents attached; plant the pumpkin top in an appropriate size pot with potting soil and water rarely. The succulents will continue to grow.

BTW, I was at the Farm Patch in College Station over the weekend, they still have pumpkins and a nice selection of succulents.


Monday, November 14, 2016

Now on Instagram!

The Underground is now on Instagram!
Follow and see what is really going on in the basement on Buckner Lane! 

#craftingfromtheunderground

Monday, November 7, 2016

Luggage Tag Travel Memory

What could be more personal than turning one's travel photo into a luggage tag? Here is how I made tags for each of my travel companions on a recent trip to Italy.


This is what you will need:

White fabric for printing photo, (I used a mid-weight muslin)
Freezer paper
Painter tape
Fabric for back of tag and strap
Heavy weight fusible interfacing
Clear vinyl

Let's print the photo first.

Cut white fabric and freezer paper to 8 1/2 X 11-inches.
Iron freezer paper to fabric.
Place painter tape across one of the short edges of the freezer paper and fabric to provide an even, sturdy edge.
Put the freezer paper/fabric sheet into the printer so the print will appear on the fabric (not the freezer paper.)
Using a photo manipulation program like Photoshop or Photoshop Elements, open the photo you want to print.
Size to fit the project, in this case, 4X6-inches.
Print using a 300 dpi resolution.
Remove freezer paper/fabric from printer, remove painter tape and pull the fabric from the freezer paper.
Cut printed image from fabric.
Detailed information about printing on fabric can be found on Linda Matthews Creative Cloth website. 

Note, photos can be printed on printable fabric such as Jacquard Ink Jet Fabric.


Cut a 4X6" piece from the back fabric and from the interfacing 
Cut a 2 X 12-inch strip from the backing fabric
From the vinyl, cut a 2 1/2X4-inch piece

Following manufacturer’s instructions, iron interfacing to back fabric.

Use painter's tape, tape vinyl to the back fabric; place the tape about 1/8-inch from the edge of the vinyl. The tape will serve as a stitching guide. Stitch around three edges. (Yep, that is my little Singer Featherweight, Wilma, doing the stitching.)

I trimmed the edges after stitching to make it neater.

Fold the strap in half, press.

Open and press each side to the center


Fold the two long sides together to create a 14-inch strap.


Sew the two long sides together


Top-stitch the other long side.
Now you have the strap.
I pressed the strap after I took the photo

Fold the strap in half and baste to the short edge of the back. Keep in mind how the tag will hang on the luggage; stitch the strap to the end where the vinyl is open.

Whoops, forgot to photograph this step. (Obviously I am a novice at writing tutorials.) 

Stitch the two pieces, right sides together with the strap sandwiched in the middle, stitch around three edges,

leaving the end opposite the strap open for turning. 

Trim the seam to 1/8th inch, clip corners. (Important as Wilma does not do thickness well.)

Turn right sides out (Do you really need a photo of  the turning process?)  and press. (I place cardboard inside the tag before pressing to protect the vinyl.)

Fold the unstitched end under, press. 

Top stitched completely around the tag
Ouch, this is a pretty poor photo!

Back of the tag
I used Kraft-tex on this one; more on this amazing product in a future post.

There we have it, memories of

The Amalfi coast,

the villa where we stayed

and, of course gelato.


As one of my few attempts at writing a tutorial, let’s just say this is a work in progress.

I would be remiss if I didn’t give credit to my friend, Cathy, at Cathy Neri Quilts for lending me a tag to copy.

 
Look how neat her craftsmanship is; you can tell she is a professional.

Monday, October 31, 2016

The other shop door

makes it clear as to whom the shop belongs.


Using pieces of the left over pickets from the plant deck Handy Randy built last summer, I created these signs for the side door of his shop.

I used the Paint and Peel method for this sign. I don’t have photos of the process but it is pretty simple.

Most often I use whatever paint I have on hand for making signs; it may be latex, craft paint, acrylic, chalk, indoor or outdoor. If I want to preserve it for a while, I will give it a couple coats of polyurethane. Since I have AADD, I don’t go for longevity in signs. They are easy to repaint or do-over when a whim hits.

First I sanded the wood; of course this wood doesn’t actually get smooth, but for this project that is okay.

I painted the base white and let it dry.

While it was drying I created the words in the Silhouette Portrait  program and cut them from the ugly contact paper I picked up at a yard sale.

I placed the letters on the base board and painted over the letters with the same white paint (this kind of seals the edges to prevent the paint from bleeding.)

After the white paint is totally dry, I painted the Handy Randy sign gray and the shop sign red, not bothering to cover it completely as I wanted a rustic look.

With the help of tweezers, I pulled the contact paper letters from the wood, revealing the words.

After the paint dried, I attached heavy duty magnets to the back and hung them on the shop door.

And that is all there was to it.

Justa Girl and her Blog has very detailed instructions for the paint and peel method on her blog which is very helpful if you are not experienced in using the Silhouette. Note, she used vinyl where I used the cheap contact paper. Of course you can Google “paint and peel using a Silhouette."


Monday, October 24, 2016

A little Bohemian in the garden? Why not?


One of the doors leading from HR’s shop into my garden looked pretty blah, all white and industrial. Before leaving on our fall travel adventure, I decided to have a little fun with it.

Amazon offers 6”X6” pieces of various colors of Oracal 651 craft vinyl for around $8 for a package of 12 pieces. I ordered two packages. This was a really easy project since it was pretty much random placement. I cut the flowers with my Silhouette Portrait, using the Silhouette Nature Flower designs.


Love it! The Oracal 651 is weatherproof so I am sure I will find other ways to use it in the garden (probably will add more flowers, maybe some leaves and who knows what else to this door.) 

Wednesday, October 19, 2016

Missed me?

Yep, I have been wandering around above ground for the past couple of months.
In late August we loaded The Wanderer

with a few craft supplies, my easel  and my little Singer Featherweight,

along with gifts for our niece and her husband’s mountain home which is currently under construction.

Handy Randy made the sign in his shop
Freezer paper stencil cut with Silhouette Portrait ironed onto burlap and painted with craft paint

We traveled to Texas via Tennessee, North Carolina, Georgia, South Carolina, Alabama, Mississippi and Louisiana. We plan to stay in Texas through the football season.

The Featherweight is set up at my mother-in-law’s home where I have stitched a couple of bags including a phone sleeve to carry to football games. 

Pocket for phone
Pocket for ticket


It complies with the SECrequirements for bags that can be brought into the stadium; depending on the person taking the tickets, it might have to go through the line to be searched. So I stick it in Handy Randy’s pocket until we get in the stadium (wonder why pockets aren’t searched?) The pattern is one I frequently use from  Sher’s Creative Space. (I no longer see the pattern on the web site, but there are a ton of other free patterns listed.)

On the flap of this wristlet is a photo from our visit in Cortona, Italy.


How did I do that? I ironed a piece of heavy cotton fabric onto a piece of freezer paper and printed it on my home printer. I think the image would be brighter had I treated the fabric with digital ground before printing.

Currently I am working on a surprise for the folks with whom we traveled to Italy last May. I would tell you about it, but it is a secret. Perhaps I will share photos after our get together next month.  


Even though I am not in The Underground, I continue to feed my soul with crafting. 

Wednesday, August 10, 2016

Silhouette and Drop Cloths

Last weekend we hosted our annual Texas Barbecue. We were excited to have Blue Bell Ice Cream back on the menu as it is the official ice cream of Texas. (It was missed last year as production had stopped due to listeria.)  To celebrate its return I thought we should give it some star attention (actually I was looking for an excuse to play with my Silhouette Portrait.) I had seen all the chatter on Pinterest about the use of canvas drop cloths; it was a no-brainer.  


If you have been following my blog, you know about freezer paper stencils for fabric. It worked so very well on the drop cloths! For these projects I used inexpensive craft paint.

Our tablecloths were also made from canvas drop cloths.  I think I paid $11 or $12 for a 15 by 4 ft. drop cloth which I cut in half to have two 71/2 by 4 ft. table cloths. That isn’t much more than the plastic cloths I have bought in the past. They washed and ironed beautifully, looked so much better and can be used again and again. I may even stencil on them!

The party was a success even though I could not find the Howdy banner I made a few years ago.